Counting trees accurately is an essential skill for people working in the woods. Does a woodlot contain valuable timber? Are the trees growing densely or sparsely? Which tree species are dominant?
A forester or logger needs to be able to make these assessments accurately and quickly. But as you might guess, these professionals don’t count every single tree. Instead, they take a sample of the trees growing at specific spots and then extrapolate their finding across broad areas. These techniques often require specialized equipment, but for the price of a penny, you can make your own tree-counting tool and begin to answer these questions in your own woodlot.
The tool is called a penny gauge, and to make one, punch a hole through one edge of a regular old penny and tie a piece of string through the hole. Cut the other end of the string so that it’s exactly 24.75 inches in length between the penny and the free end of the string.
Now take your penny gauge for a walk into your nearby woods.
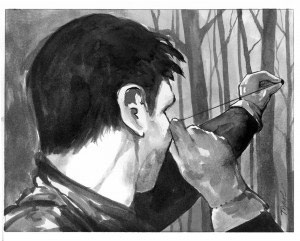
At a random place, stop and bring the free end of the string up to your eye and extend the penny horizontally away from your eye to make the string taut. Now glance down at the ground below the penny and take note of a landmark, perhaps a fallen birch twig or a stone. You goal is to keep the penny directly over this landmark as you slowly walk in a circle around the penny, keeping the string taut the whole time.
As you start your circle, look past Lincoln’s profile at the trees behind the penny. Whenever a tree comes into view behind the penny, stop, regardless of whether the tree is close to you or far away. Compare the tree’s diameter to the penny’s diameter. If the tree is wider than the penny (remember, the string needs to be taut between your eye and the penny), you tally it. If the tree is narrower, you don’t. If it’s exactly the same width as the penny, you call it “one half.”
Keep your tally on a piece of paper, noting the species of each tree as you go. If you are having trouble identifying a tree, go introduce yourself, but then be sure to return to the same landmark with your penny before resuming your circle. Keep going until you’ve made a full 360-degree circle around the penny.
You’ll notice that distant but large trees were added to your tally, while small trees had to be much closer to you to appear wider than the penny. The statistical term for this type of survey is a variable-area analysis: you are taking both a tree’s diameter and its distance from you into account. In doing so, you are creating an estimate of how common each tree species is relative to the others.
Technically, the penny gauge is sampling the basal area of the trees in the landscape. Basal area is defined as the surface area of the stump should the tree be cut down. Foresters and loggers always measure the basal area of a tree at what’s known as “diameter at breast height,” which is defined as being 4.5 feet off the ground. If you want to be official about your measurements, therefore, you should hold your penny at that exact height. You might have to crouch down somewhat, but that’s still much easier than having to squat down and measure every tree at ground level. Now you see why foresters didn’t choose “diameter at boot height,” even though that’s where most trees end up being cut.
The penny gauge is not measuring the basal area of any individual tree. Rather, it is providing you with a good estimate of the total square feet of basal area of each tree species growing in your surveyed area. Assuming you can see a distance of about 100 feet or so into the woods as you walk around your penny, you’re surveying about an acre. Multiplying your tallies by 10 will tell you the per-acre basal area of each tree species in your woods.
On a recent trip into the woods, for example, I found a site where I recorded the following: beech 3, sugar maple 2, and red spruce 1. I multiplied the full tally (6 trees) by 10 to reach a total basal area of 60 square feet per acre. Every forest is different: young forests, such as the one I was surveying, often tally in the 60 to 80 range. Mature forests, thickly stocked with large trees, might exceed 150 square feet per acre. Among other things, you’ll quickly discover that pines, spruces, and hemlocks naturally grow more thickly than maples, birches, and beeches.
Not bad information to get from such a low-tech tool.
Discussion *