While there are plenty of wreathmakers in Vermont, it's quite possible that no two of them make a wreath the same way. For our wreathmaking lesson, we went to Claudette Allen of Craftsbury who specializes in a very traditional balsam fir Christmas wreath.
As a child, she had watched her aunt make them at Christmas workshops at Craftsbury Common. Then, eight years ago, Claudette began making wreaths on her own to try to put together some extra money for Christmas for her family. Now, each year she makes over a hundred of them starting in early November. "You can't get started until you've had two or three good hard frosts to set the needles," she said.
Like many wreathmakers, she prefers the balsam fir above all other trees. In fact, she uses fir branches exclusively in her wreaths. "Balsam smells very nice and makes a nice looking wreath. Sometimes, you'll see a sprig of cedar or white pine but I've never had anybody order anything like that. Around here, balsam is mostly what people want." It's also easier on the hands because its needles are fairly soft, and not as prickly as spruce.
Claudette's husband George and their two sons, Jason and Shaun, collect most of her brush for her. They look for young fir trees that average 8 feet high with a base diameter of 4 inches. The brush they're after has good branching and its double row of needles lays flat.
You won't need many supplies. A 12- inch crimped metal ring can be found at craft stores or from a wholesaler like Kelco. This ring will make a wreath with a diameter of 22 to 24 inches, which is ideal for a door. You'll also need a spool of 23 gauge green coated wire. You might also want a pair of clippers, although Claudette breaks off her pieces as she goes. And finally, you'll need a good armful of brush.
With the ring on a table in front of you, turn it so the welded seam is at the bottom or at 6 o'clock. You'll cover the seam with your first bunch so your fingers won't have to rub against it as you work your way around. At the seam, wrap the wire around the ring and criss-cross it over itself two or three times so that the wire doesn't slip when you pull on it. You won't be cutting the wire until the end, and all your wrapping is done by rotating the spool around the ring. Establish the direction of your rotation and stick with it.
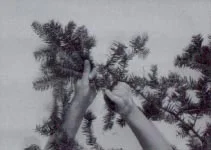
Put together your first bunch by cutting off a piece about 10 inches long that has a nice fan-like spread of eight to 10 inches. Hold it up to the light and there's plenty of places you can see through (see photo at left). The next pieces you add will form a fan that you can't see through.
Claudette said, "You want a couple of nice pieces to start, because you want to lay a nice base first." Then you can use less than perfect pieces that will give some bulk and some length but only their tips will show; the wood will be hidden.
"The wider you can get your fans the better," said Claudette. "I can't tell you how many pieces it takes, because each one's different. When I feel that there's enough in my hand and the bunch looks right to me, that's when I know I've got a good bunch. You don't want your pieces too long because they'll be floppy, but if they're too short, you don't get the nice fullness of the wreath. It's all a question of feel." (See photo gallery below for how to assemble a bunch).
Once you've assembled it, put the stem end to your right and the tips to your left, and tie your first bunch to the front of the ring. Wrap the wire around it once to place it, then wrap two or three times to get the stems tight to the ring. Be careful not to wrap too tightly because the wire could cut right through your branches.
Assemble another bunch, and attach it to the back, slightly ahead (clockwise) of the one on the front. Claudette doesn't turn the wreath over to attach her bunches to the back side; instead, she lifts the wreath up enough to make her wraps. "When you wrap, make sure you don't twist the bunch," she said. "You want them to lie flat, back to back."
Then you rotate the ring clockwise in inch or two-inch increments, tying in a new bunch front and back as you make your way around the ring. "Don't be tempted to get around the wreath quicker by using longer pieces. It's nice to have a little bit of droop, but you don't want them curling around or swinging around."
Keep going until you reach the end. When you get to the last front and back pieces, you have to reach in under your starting pieces to tie them in without tying in the tips of the first pieces. When you are ready to tie in the back bunch, leave about 16 inches of wire and then cut it. Double the wire over so it makes a loop and then twist it like you would a twistie closing a bread wrapper. Wrap your back bunch in with this twisted wire and you end up with a loop with which you can hang the wreath. Tie a piece of yarn to it and you'll be able to find the loop later.
Claudette decorates some of her wreaths and leaves some plain for the buyer to decorate. Use the green wire to tie in pine cones or sprigs c f holly or a red bow or whatever you would like to add to your greens. Just be careful not to tie down any tips.
And that's all there is to it. Good luck!
Let's face it, anybody can decorate a Christmas tree. It's almost as if we were born with the ability, and we put it into practice as soon as we are tall enough to stand up and attach an ornament.
However, making a Christmas wreath is altogether another ability, and only those willing to stare a mystery in the face will ever find out how all those little branches stay on. If you possess that curious spirit and you've wondered how to make your own wreath for the door, wonder no more. Learn how in the photo gallery below.