

After bucking this year’s firewood, I found myself with a collection of odd-shaped ends and crotches, perfect for charcoal-making. Charcoal is essentially wood that’s been “cooked” in the absence of oxygen, a process known as pyrolysis. After a few hours in the kiln, what you’re left with is nearly pure carbon that’s energy-rich and perfect for grilling, or even firing up a forge. Based on how much you’re looking to make, this same process can be scaled up (using large metal drums) or down (using small paint cans), consistent with the method described below.
Step One: To make charcoal you’ll need two barrels: one to hold the charcoal (the crucible), and a second larger barrel to contain the fire (the kiln). For this project, I used a 10-gallon metal trash can as the crucible and a 40-gallon metal trash can as the kiln. Drill a half-inch-diameter vent hole in the crucible lid and approximately 20 vent holes of the same size around the base on the kiln, evenly spaced.

Step Two: Fill your crucible with split chunks of hardwood about four inches long. (This batch was a mix of American beech and sugar maple.) Pack the wood tightly and to the top of the can (the photo shows just the first layer of these small pieces) to minimize air space. Replace the lid, crimping the edge with a hammer.

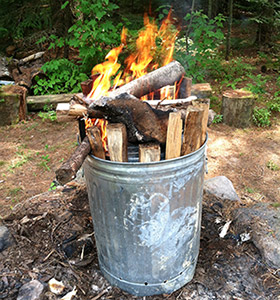
Step Three: Prepare the kiln by stacking two courses of firewood in the bottom, the first perpendicular to the second; this will form a base with good air circulation for the fire. Next, place the crucible inside the kiln on the prepared base and pack wood slabs between the crucible and kiln.

Step Four: Light the kiln fire and maintain even heat for 3-5 hours. You can stack additional firewood on top of the kiln; just make sure the crucible vent is clear.
Step Five: As the charcoal nears completion, you’ll notice a short flame shooting from the crucible vent. Maintain the fire until this flame dies out, then plug the hole with a wet rag, and allow the kiln and crucible to cool.

Step Six: Finished charcoal, ready for your next BBQ.

Discussion *