The demise of the local sawmill has been closely followed by the rise of the sawyer with a portable bandsaw mill. Usually the sawyer will come to your house, set the mill up parallel to your log pile, and cut custom boards for you, but it’s often up to the client to furnish a tailer who will stack and sticker the sawn lumber. If you lack teenaged children, this job may well fall on you.
Much of your satisfaction – or dissatisfaction– from a custom milling project will be the result of how the lumber is treated after it is pulled off the mill’s bedrails, so proper stacking is critical.
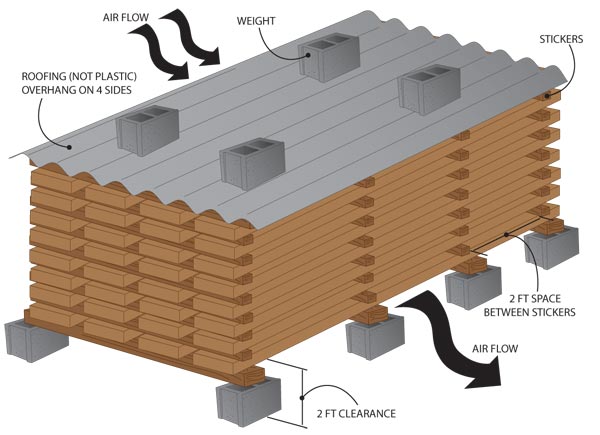
You’ll want to build your lumber pile perpendicular to the prevailing wind. It’s not a good idea to stack green lumber inside a closed building, as air movement is important to wick moisture away. Use cinder blocks for a base, and level them as best you can. The goal is to have the first boards a foot off the ground. The stack should be 3 to 4 feet wide, and supported every 2 feet to minimize warping. Span the cinderblocks with level, seasoned 4x4s (known as dunnage) and leave a gap between boards to allow air penetration.
For the lumber to dry properly, you’ll need to sticker your pile. Stickering refers to the use of narrow strips of wood – typically 1”x 1” – between the layers of lumber to allow adequate air flow. For best results, the stickers should all be the same length (the same as the width of the pile) and rot- and stainfree (to minimize staining your lumber). In a perfect world, the stickers would be dry, but billions of feet of wood have been stacked using green stickers created in the board edging process with perfectly adequate results.
Keep each layer of stickers directly over the dunnage and lined up with the stickers below and keep the edges of the outside boards plumb. A sticker placed right at the end of a board tends to stop deep end splits from developing. While 2-foot spacing is adequate for most species, you may want to consider 18 inches or even 1-foot spacing for species that warp excessively, like sycamore or elm.
Build up to a height you are comfortable with, add 6 inches of dry dunnage on top, then cover the pile with metal roofing, making sure that the roof has a 6-inch overhang and that nothing is sticking out in the weather.
How long will it take for your lumber to season? Softwood generally seasons faster than hardwood, but just how long it takes depends on how much moisture the log had in it when it was cut, the time of year, the thickness of the lumber, how much it is exposed to wind and sun, and how good you are at stickering your wood. The US Forest Service estimates that it takes between 60 and 200 days to air-dry green, 1-inch-thick white pine lumber to 20 percent moisture content.
Blue stain is a common problem with sawn pine, though it usually occurs in the log, not in the boards. To avoid blue stain, have your pine sawn during the winter, then sticker it and cover the top so the wood seasons prior to warm weather. If you’re using your lumber outside, say for siding that outbuilding, the blue stain will eventually weather away.
Sticker stain is another common problem in white wood. It’s caused by slow drying at warm temperatures when the lumber is above 40 percent moisture content. The only sure way to avoid sticker stain is to achieve fast drying, and to do this you might be wise to invest in kiln-dried stickers that have a diagonal groove cut into the top and bottom flat faces, which allows for optimum air circulation.